| Channel | Publish Date | Thumbnail & View Count | Download Video |
|---|---|---|---|
 | Publish Date not found | 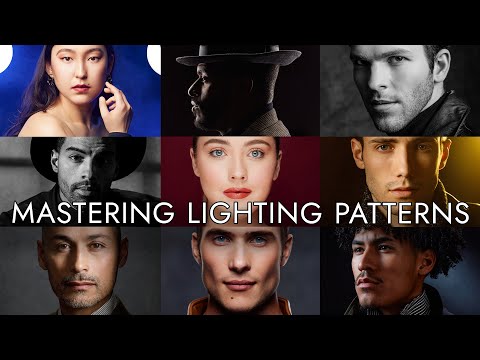 0 Views |
The term “lighting pattern” is just a fancy way of describing how shadows fall on your subject. This is a fundamental knowledge that we all must have when choosing how to light our subjects. And if you're a natural light photographer, don't think for a second that this is fancy stuff that only flash enthusiasts need to know.
To sign up for a free Academy trial with John Gress, click here:
https://johngress.com/academy/
Click here for a complete list of all the gear I use https://shop.howl.me/JohnGress
To better illustrate this concept, let's imagine a clock, with the camera positioned at 6 o'clock, facing 12 o'clock, and the model standing right in the middle. The times around the face will represent different positions of our light sources. These sources could be lightning or the sun.
Split Lighting (9 or 3 o'clock): Split lighting involves setting a single light at 9 or 3 o'clock, which illuminates one side of the subject's head. While this technique can create an interesting contrast, it's not always the most flattering choice. In fact, I have to admit that I personally find this lighting model less than ideal. To show my reservations about this, I had to dig deep into my archives to find an example. Surprisingly, the first image I came across was a test image.
Backlight or Rim Light (12 o'clock): When the light is behind your subject at 12 o'clock, this can give nice rim lighting. I like to pose my subjects in profile with a black foam board between them and a large octabox. If the light source is much larger than the card, you'll likely get a captivating light on their eye. But if you don't get one automatically, there is a little trick you can use. First, position the subject in profile facing your left, then ask them to turn their head slightly toward the light. Then, if you move to the left, you can probably capture a perfect silhouette with light on the eyelids. Of course, you can have them face right and turn slightly left as you move to your right.
Butterfly Lighting (6 o'clock): Butterfly lighting occurs when you place a light source slightly above and in front of your model at 6 o'clock. The resulting shadow under their noses and nostrils is supposed to resemble a butterfly, but let's be real: not everyone sees it. If you place the light too high, you might end up with dark shadows covering their eyes, or there won't be any captivating lights, which are a reflection of the light in their eyes. If this happens, simply turn on the modeling light and turn down the modifier until you see a glint in their pupils.
Flap Lighting: Flap lighting is achieved by combining butterfly lighting with a reflector or light placed underneath as a fill light. When viewed from the side, it resembles the shape of an open shell. This technique creates a flattering light for many people because the filler fills in wrinkles.
Loop lighting (5 or 7 o'clock): Loop lighting involves positioning the main light just above eye level, at approximately the 5 or 7 o'clock position. This creates subtle shadows on one side of the subject's nose and is generally suitable for most people. If their nose leans to one side, you'll get better results with light on the side their nose leans toward.
Rembrandt lighting (4 or 8 o'clock): Rembrandt lighting is named after the Dutch painter Rembrandt Harmenszoon van Rijn and is achieved by placing the light closer to 4 or 8 o'clock. The light source should be far enough away to allow the shadow of the subject's nose to extend toward the shadow of their cheekbone. This technique also causes the appearance of a bright area in the shape of an inverted triangle under the eye, opposite the main light. While it may not suit every face, Rembrandt lighting offers a captivating, artistic look that I personally love, and I use it frequently with loop lighting.
Short Lighting: Short lighting involves positioning the light source in the same way as Rembrandt lighting, but you also point the subject toward the light. This technique can have a slimming effect on the subject because most of their face will be in shadow.
Wide lighting: Wide lighting is similar to short lighting, but the subject is slightly away from the light source. In this position, both eyes should receive light and the face will likely appear wider because more of it will be illuminated.
Cross lighting: To achieve cross lighting, place the main light source at 4-5 o'clock and an edge light at 10-11 o'clock…
Chapters
00:00 – Presentation
01:36 – Shared lighting
02:21 – Backlight or rim light
03:14 – Butterfly lighting
03:54 – Flip lighting
04:19 – Loop lighting
04:52 – Rembrandt Lighting
05:46 – Short lighting
06:03 – Wide lighting
06:47 – Cross lighting
07:06 – Takeaways
Please take the opportunity to connect and share this video with your friends and family if you find it useful.