| Channel | Publish Date | Thumbnail & View Count | Download Video |
|---|---|---|---|
 | Publish Date not found | 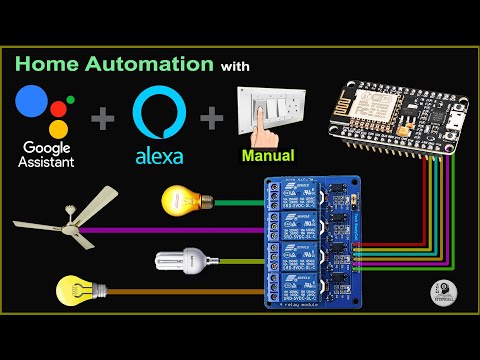 0 Views |
2 for 1 to 4 layer PCB, get SMT coupons: https://jlcpcb.com/RHS
Download the Gerber PCB file for this NodeMCU IoT based home automation project
https://drive.google.com/uc?exportdownload&id1Jx4D_DSV_ei1y0a82AbtxbsNhy8sjCmY
During the tutorial video, I covered the following topics:
00:22 Control devices with Google Assistant and Alexa using NodeMCU
01:11 Control devices manually with switches.
02:36 Components required for this NodeMCU project.
02:49 Circuit diagram of NodeMCU home automation project.
04:07 How to create and configure a Sinric Pro account.
05:37 Programming NodeMCU with the Arduino IDE
07:37 Configure the Amazon Alexa app to add IoT devices.
08:41 Configure the Google Home app to control NodeMCU with Google Assistant.
09:46 Control relays with voice using Google Assistant
Components required for each room for this NodeMCU home automation
1. NodeMCU
2. 4 Channel 5V SPDT Relay Module
3. Switches or push buttons
Amazon India Affiliate Links:
NodeMCU: https://amzn.to/3fJA4EG
4-channel 5V relay module: https://amzn.to/2BQ5Y3o
Echo Dot Alexa (4th generation): https://amzn.to/3srCiPA
Amazon US affiliate links:
NodeMCU: https://amzn.to/2WoR2A2
4-channel 5V relay module: https://amzn.to/3r2HuJ4
Required Components for NodeMCU Control Relay Module PCB:
1. 5v relay (SPDT) (4 no)
2. BC547 transistors (4 no)
3. PC817 Optocuplors (4 no)
4. 510 ohm 0.25 watt resistor (4 no) (R1 – R4)
5. 1k 0.25 watt resistors (5 no) (R5 – R9)
6. 5mm LED (5 no)
7. Diodes 1N4007 (4 no) (D1 – D4)
8. Push buttons (4 no)
9. Terminal connectors
DC 10. 5V power supply
**Here I can control the 4 relays manually with switches. But as I used Sinric Pro free account, so I can control 3 devices with Google Assistant and Alexa. To control the fourth device, you need to purchase 1 device in Sinric Pro.
**If using Switch, Switch-2 must be powered off during the NodeMCU boot process. But for the push button, this limitation does not exist.
**You don't need Alexa devices like Echo Dot or Google Home Mini. You can simply use the Google Home app and Alexa app for this IoT project.
Download the code for this NodeMCU smart home automation project from the following article
https://iotcircuithub.com/smart-home-with-google-assistant-alexa/
During the Internet of Things tutorial video, I explained all the steps to create this NodeMCU ESP8266 smart home system with Sinric Pro to control home appliances with and without the Internet. I created this Google Assistant control smart home system without IFTTT. If the NodeMCU is connected to WiFi, you can control the relays from anywhere in the world with Alexa and Google Assistant. And you can also monitor real-time feedback in the Amazon Alexa and Google Home IoT apps. So, with this smart home project, you can convert any device into IoT devices and control them over the Internet.
Now all you have to do is ask the Google Assistant: / "Hey Google, turn off the lights/
Please take the opportunity to connect and share this video with your friends and family if you find it useful.